Getting Started#
This tutorial will explain the basics of CLS by working through a simple set of role cards for the game Werewolf.
To get started, download and install the CLS Renderer, and open up your favorite code editor. If you don’t already have a favorite code editor, I recommend VS Code, by Microsoft. There’s an official language plugin for VS Code that’ll make it easier to write layouts, just look for it in the extension marketplace.
Tip
If you’ve never programmed before I recommend typing out each example as we find it. Programming makes use of lots of special characters and it can take time to build the habits for typing them.
Layout Files#
CLS is used to make layout files with the extension “.cls” to describe a generalized card (the layout), which gets turned into a set of actual cards. Layouts are made up of sections, which are split into special sections and elements. Elements are the individual elements of the card, like a text box or an image. Special sections do all sorts of things, like setting the size of the card, changing the name of exported pdf files, and specifying data used to render cards.
Let’s start with the layout special section.
The Layout Section#
The basic structure of a section is: a name, a pair of curly braces, and in those braces, content. Most commonly that content is in the from of properties which are: name, a colon, and one or more values separated by commas.
layout {
    size: 2.5in, 3.5in
}
The layout section sets the size and resolution of the card as well as how to process the data. The size of this card is 2.5 inches wide and 3.5 inches tall. This is the standard US Poker card size. We’re using the default resolution of 300 dpi (dots per inch) which is a commonly used resolution for printing. As for the data…
The Data Section#
When the CLS Renderer process a layout it combines the layout with a data table one row at a time, and each row creates a card. We could use an external editor like Excel to create this data, but for small sets it’s easier to embed it right in the layout file with the data section.
data {
repeat, role
2, werewolf
1, seer
4, villager
}
Data is represented as comma separated values, CSV for short.
The first row acts as the names of macros used to reach the data. The column repeat is a special column that causes that row to generate that many cards, so there’ll be 2 werewolf cards, 1 seer card, and 4 villager cards.
Data can be represented two ways, the first as the data section shown above or as a property of the layout section as described here. Unlike the other sections, data is not indented.
The Macros Section#
Macros are how values are pulled from the data, these are called variables. They can also modify data and select values conditionally, these are called functions. The macros special section lets us make our own macros, like this color variable.
macros {
    dark-red = #a32b1d
}
Notice that macros are defined with an equal sign. You can also make your own functions, which is described in more detail here.
Colors in CLS use the standard hex color format, either #RRGGBB or #AARRGGBB if you want transparency. There a hand full of common color names available, such as black, white, and transparent; but outside of these three making your own colors will generally look better.
Now onto putting things on the cards.
Element Sections#
Elements are parts of a layout, these can be text, images, or simple shapes. Each element is it’s own section, and as we’ll see in the next chapter, elements can contain other elements.
The Text Element#
The first thing we should put on a card is the role, so let’s look at a text element.
role {
    type: text
    position: center, .5in
    size: 1.5in, .25in
    font: 12pt, Palatino Linotype
    font-color: [if| [eq| [role], werewolf], [dark-red], black]
    align: center, middle
    text: [capitalize| [role]]
}
That looks like a lot, but let’s break it down so we can see what it’s all doing.
role {
    type: text
This creates the element, which will be named “role”, and be of type text, which as you may guess is an element type that draws text.
    position: center, .5in
    size: 1.5in, .25in
These lines position and size the element. We want it centered horizontally and that’s exactly what the center keyword does, then a half inch away from the top of the page. The size is one and a half inches wide and a quarter inch tall. We could also use fractions for the same effect, as in
    position: center, 1/2in
    size: 1 1/2in, 1/4in
Fractions and decimals are equivalent, some numbers are easier in one or the other, like 1/8 or 0.3. For this tutorial we’ll be using decimals everywhere.
    font: 12pt, Palatino Linotype
    font-color: [if| [eq| [role], werewolf], [dark-red], black]
    align: center, middle
The font property sets the size and name of the font, and optionally the color of the font. For readability I’ve split the color out. The align property positions the text within its defined size. As for that font-color, it’s our first look at macros and we’re gonna take it inside out.
[role]
This is easy, the [role] variable pulls the value of the role column for this card/row.
[eq| [role], werewolf ]
Functions use vertical bars to separate the name of the function from it’s arguments, and commas to separate arguments from each other. Whenever you see a vertical bar in a macro it means it’s performing extra computation on it’s value. In the case of the [eq| ] function here, if its arguments are the same, it returns (turns into) true, or otherwise returns false.
font-color: [if| [eq| [role], werewolf ], [dark-red], black]
This is the whole value. The [if| ] functions takes as it’s first value a true or false value, called a toggle in CLS, and if it’s true it returns the second argument, or the third argument it’s false. So this whole thing checks if the role of the current card is werewolf, and if it is the font color is made [dark-red], or if it’s some other role the font color is made black. There are a fair number of macros which are listed here.
text: [capitalize| [role]]
Lastly, the text that will actually be drawn on the card. Compared to our last macro, this is pretty easy; it just capitalizes the first letter of [role].
In your own layouts you’ll see macro sequences like this just as often as the value for font-color. Macros are a powerful programming tool, but never feel like you have to find the most elaborate macro sequence to do the most with the fewest columns. I only use a complex macro sequence to show you what’s possible with macros. We could just as easily have data that has a color column like
data {
repeat, role, color
2, werewolf, [dark-red]
1, seer, black
4, villager, black
}
You can see the color macro we defined earlier right in the data. macroWork can tell when macros return other macros and will process them until no macros are left. Then for font-color all we need is
font-color: [color]
This would work just as well.
The Image Section#
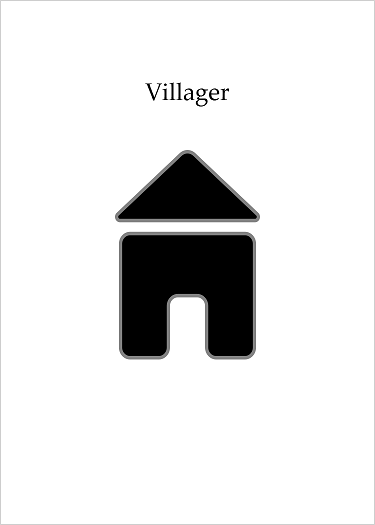
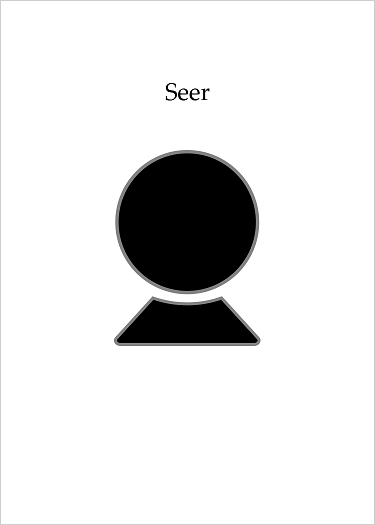
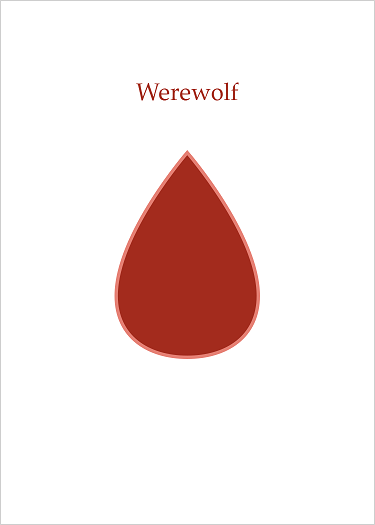
Theoretically, we could stop here, all we need to do is tell players what role they have. But let’s give them an icon.
icon {
    type: image
    position: center, 1in
    source: images/[role].png
}
This should all make sense by now. The only new thing is the source property that tells us where the image is located. We don’t need to specify a size because CLS will use the image at full size by default.
These images come with the CLS Renderer in the examples folder.
The Export Section#
The last step before we can make any cards is the export section.
export {
    destination: cards
    bulk {
        name: [role][repeat-index].png
    }
}
The export section operates on export targets, each of which specifies settings for one method of exporting cards. There are currently three export targets in CLS:
bulkexports cards to their own imagespdfexports the cards to a pdfttsexports the cards to images suitable for Tabletop Simulator
Properties within the export section directly change the specified setting for all export targets, so here everything will be exported to a folder named “cards” that lives in the same folder as the layout file. If this folder does not exist the CLS Renderer will make it.
The export section can also have a subsection named for each export target, and the properties in those subsections control that export target only. So in this case the bulk export target is set to name each card according to it’s role value and [repeat-index], which is the number of times this row has been used to make a card.
A full exploration of the export section can be found here
First Look at the Cards#
Let’s take a look at the cards, but first a look at the layout file all together
layout {
    size: 2.5in, 3.5in
}

export {
    output: cards
    bulk {
        name: [role][repeat-index].png
    }
}

macros {
    dark-red = #a32b1d
}

role-border {
    type: rect
    position: center, .5in
    size: 1.5in, .25in
    corner-radius: .1in
}

role {
    type: text
    position: center, .5in
    size: 1.5in, .25in
    font: 12pt, Palatino Linotype
    font-color: [if| [eq| [role] | werewolf ] | [dark-red] | black ]
    align: center, middle
    text: [capitalize| [role] ]
}

icon {
    type: image
    position: center, 1in
    source: images/[role].png
}

data {
repeat, role
2, werewolf
1, seer
4, villager
}
You’ll notice that the sections aren’t in the order that we first saw them in! Sections follow a canonical order to make reading layout files easier:
layoutexportthe subsections can be in any ordermacrosdefaultswe’ll see this section on the next page!element sections in reading order; left to right, top to bottom
data
So if we open this in the CLS Renderer and click the Export button we’ll get a folder named cards with seven cards in it that look like these.
Note
These cards were given a thin border to make it easier to see their size, your cards will not have this border.
Looks pretty good but we make them better. In the next section of this tutorial we’ll look at some more elements types and advanced features.